FaceTec Server - Debugging Initialization (New Integrations and Upgrades)
Learn how to diagnose behaviors concerning new integrations and updates with the FaceTec Server.
New Integrations
If you are integrating the FaceTec Server for the first time, please see the Setting up the FaceTec Server Guide.
From configurations on local machines to Cloud Hosting Services, these guides have comprehensive step-by-step procedures and videos to assist users in running the FaceTec Server.
Updating the FaceTec Server
Important Note: Please follow every step in this guide. 99% of Server Initialization problems occur when Developers do not perform these important instructions. When performing an Update, first ensure that the latest FaceTec Server works with ZERO code modifications, and THEN, apply your own custom configurations. After applying your own custom configurations, remember to test them to verify that they still function as intended.
Zero Downtime Updates: It is imperative to keep a backup of the previous FaceTec Server until the update to the latest version is complete. We also highly recommend developers and customers use Blue/Green Deployment swapping (1) (2), as this strategy allows for a zero-downtime update.
Step-by-Step Guide
- In Download SDKs, choose Server.
- In Database, choose “In-Memory Stub DB”.
- In Initialize For Postman Test Suite With Server, click "Yes" (necessary for Step 3).
- Download and Extract the FaceTec Server.
- Go to the Deployment Scripts Directory:
cd FaceTec-Server-Webservice/Deployment-Scripts. - Run the run.sh bash script:
./run.sh.
Note: If Your Environment does not support Bash natively, then the Docker Compose Commands will need to be run manually instead:- Run
docker compose build facetec_server_prebuilt_with_usage_log_server facetec_usage_log_server. - Run
docker compose up facetec_server_prebuilt_with_usage_log_server facetec_usage_log_server.
- Run
- On success, http://localhost:8080/status will show a JSON Success Message.
Important: You must first verify that when using the Configuration Wizard that the FaceTec Server starts without ANY modifications to the code.
Diagnosing Problems Running the FaceTec Server Locally
If the FaceTec Server fails to run in Step 1, then there is likely a configuration-related behavior with your Local Environment. When testing in your Local Environment, ensure the configuration is exactly the same as your server.
For Usage Log Storage Behavior, please ensure Usage Logs are not being stored on Ephemeral Storage. Usage Logs must be written to a Persisted (Non-Ephemeral) File System so that FaceTec can upload any pending log data after an application restart. By default, the FaceTec Server uses Docker Volumes to ensure that Usage Logs are saved to Persistent Storage. If these Docker Settings are overwritten or need to be changed, then please see Usage Log Server - Storage Directory Configuration for additional guidance.
For Usage Log Server Connectivity Behavior, please ensure your Server's Ports and Proxy Settings are configured correctly, as these both can prevent your Server from properly communicating with the Usage Log Server. To learn more about the proper network settings and troubleshooting options for the Usage Log Server, see Diagnosing Usage Log Server Behaviors.
To learn more about Usage Logs and the Usage Log Server in general, please see the Usage Logs Guide.
Step 2: Run the FaceTec Server on Remote Linux
Step-by-Step Guide
- Download the FaceTec Server (same as in Step 1) and rename the zip to
ServerSDK.zip. - Ensure you can SSH to Your Remote Linux Machine. (AWS EC2 Example)
- Configure Inbound/Outbound Network Traffic. (AWS EC2 Example)
- Copy the FaceTec Server to Your Remote Linux Machine:
scp -i <SSH_KEY> ServerSDK.zip <USER>@<REMOTE_IP>:/home/<USER>. - ssh into Your Remote Linux Machine:
ssh -i <SSH_KEY> <USER>@<REMOTE_IP>. - Install docker on Your Remote Linux Machine (via the command line).
- Unzip the FaceTec Server:
unzip ServerSDK.zip -d ServerSDK. - Go to the Deployment Scripts Directory:
cd FaceTec-Server-Webservice/Deployment-Scripts. - Run the run.sh bash script:
./run.sh. - On success, http://<SERVER_IP_ADDRESS>:8080/status will show a JSON Success Message.
Diagnosing Problems Running the FaceTec Server Remotely
If the FaceTec Server fails to run in Step 2, then there is likely a configuration-related behavior with your Remote Environment. In addition to confirming that your Configuration is the same as your Server, please verify that Your Server's Ports and Proxy Settings are configured correctly. Usage Log Storage and Usage Log Server Connectivity Behaviors should be handled in the same manner as in Diagnosing Problems Running the FaceTec Server Locally.
Step 3: Successful Initialization both Locally and Remotely
Success! In the above steps, you have confirmed that you can successfully run the FaceTec Server in your local development environment, as well as on a remote server. By performing these steps, you have also verified that the FaceTec Server is running with your latest SDK Encryption Keys and that the Usage Log Server can connect to the FaceTec Servers.
If you have reached Step 3, then you have successfully confirmed that you can run the latest version of the FaceTec Server without any code modifications and that your Server Environment is configured correctly. By completing the prior two steps, you have also determined that any future behaviors in the Update Process are the result of integrating code customizations into the latest version of the FaceTec Server.
Step 4: Verifying Your SDK Encryption Keys
Important Note: By completing the first three steps in this guide successfully, you have already verified that your SDK Encryption Keys are being used correctly by the FaceTec Server.
To start the v10 FaceTec Server and Usage Log Server, all of the SDK Encryption Keys must be specified in the FaceTec Usage Log Server's config.yml file.
By using the Configuration Wizard to download Your FaceTec Server, the SDK Encryption Keys for deviceKeyIdentifier, serverKey, and productionKeyText will already be properly configured in the FaceTec Usage Log Server's config.yaml file.
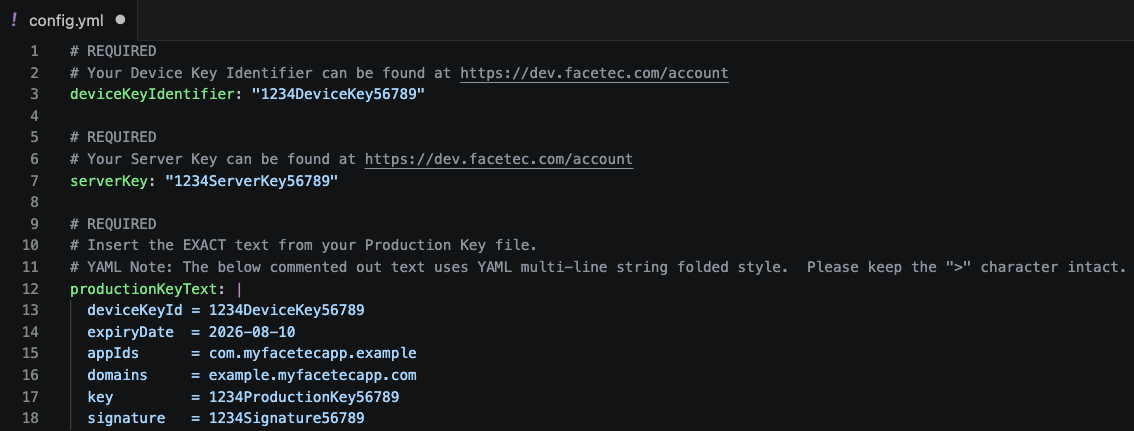
The Production Key is typically the only key that will ever need to be updated since it is the only one with an Expiration Date.
Important Note: After a short grace period, the v10 FaceTec Server and Usage Log Server will not operate if the Production Keys specified in the Usge Log Server's config.yml file are invalid or expired.
Step 5: Integrating Code Customizations
At this point, the only step remaining is to import your code customizations into the latest version of the FaceTec Server.
Important Note: Do not copy and replace files. Any file in the FaceTec Server, including config.yaml and docker-config.yaml, can receive important updates and changes. By copying and pasting your previous files, you can potentially overwrite these important changes, which can result in undefined references and missing features.
When approaching this step of the Update Process, we recommend working with two copies of the FaceTec Server: your previous FaceTec Server (with your code customizations) and the new FaceTec Server (with ZERO code modifications). We recommend tracking the customized files in your prior FaceTec Server, so you can use a file comparison tool to determine the differences between these files and the ones in the new FaceTec Server.
You should then determine if any of your code customizations should be brought into the new FaceTec Server. You can use the file comparison tool to import these changes on a line-by-line basis. As you are the only one familiar with your code customizations, it is your responsibility to determine what code changes should and should not be brought into the new FaceTec Server.
Resolving Specific Server Initialization Behaviors
To diagnose and resolve specific server initialization behaviors, see Resolving Specific Server Initialization Behaviors.