Starting Your Device Integration
This guide introduces you to important FaceTec processes and concepts to get you up and running quickly. After completing this guide, you will have downloaded the Device SDKs, run the Sample Apps, tested each FaceTec Use Case, and successfully integrated the FaceTec SDK into Your Application!
Download the Device SDK
The first step to integration is Downloading the Device SDKs.
Run the FaceTec SDK Sample App
Android & iOS:
Android: Open the
apps/SampleAppfolder in Android Studio, then run the App.iOS: Open the Sample App's
.xcodeprojfile in Xcode, then run the App.
Important Note: If you are using an Apple Silicon Mac and FaceTec's .framework, you may experience building-related behaviors when building the iOS Sample App on the Xcode Simulator. Before the introduction of the Apple Silicon Mac, the Xcode Simulator only used the x86_64 architecture. However, on the Apple Silicon Mac, the simulator uses the arm64 architecture. In the FaceTec SDK's .framework, the arm64 slice can only be built on actual devices (and not on a simulator). To resolve this behavior, you should use the .xcframework instead. It has a specific simulator framework with a stubbed out binary for x86 and arm64, which allows it to compile and build on the simulator.
Browser:
Prerequisites:
- Install Node.js.
- Run
node -v(Using the latest version is recommended).
Run Server and Launch Sample App Menu (Necessary for running Sample App):
- Open the terminal from the root of the extracted directory.
- Run
npm install. - Run
npm run facetec-browser-sdk. - If Your Browser does not open automatically, navigate to
localhost:8000.
Build the Sample App Itself:
- For the TypeScript Sample App, open a new terminal in
sample-apps/sample-app-ts/. - Run
npm install. - Run
npm run build(Terminal is left running afterBuild: 1 SampleAppController.js Completedis reached). - Select
Sample App TSfrom the main menu onlocalhost:8000.
Test the Sample App
Most of FaceTec's Core Features can be tested by using the Onscreen Buttons.
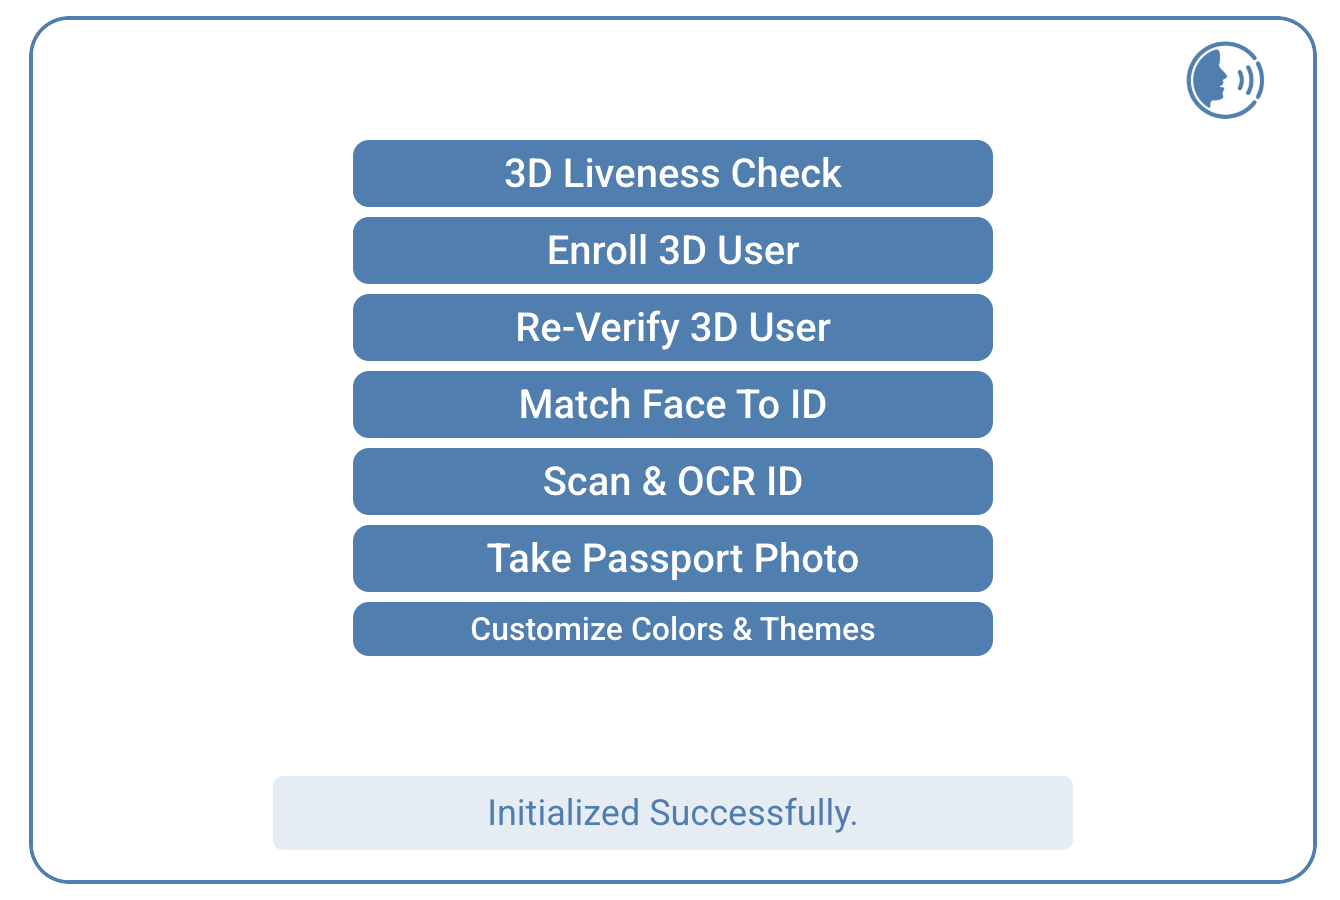
3D Liveness Check: Performs a Certified 3D Liveness Check on the User.
Enroll 3D User: Performs a Certified 3D Liveness Check on the User. The 3D FaceMap is stored on the Server to be used for future Re-Verifications.
Re-Verify 3D User: Performs a Certified 3D Liveness Check on the User. The 3D FaceMap is matched against the previously Enrolled 3D FaceMap. The Sample App functionality is highly specific in that it only remembers the Last Enrolled User in the App, but in Production Apps, you will store the Enrolled 3D FaceMaps, and Your Users can authenticate against their previously Enrolled 3D FaceMap from any device.
Match Face To ID: Performs a Certified 3D Liveness Check on the User. The User then performs an ID Scan on their Passport or Photo ID. Matching is performed on the 3D FaceMap against the ID's extracted facial image. Passport and Photo IDs are also checked by anti-tampering and anti-spoof algorithms for authenticity.
Scan & OCR ID: Performs an ID Scan of a User's Passport or Photo ID. Passport and Photo IDs are also checked by anti-tampering and anti-spoof algorithms for authenticity.
Take Passport Photo: Performs a Certified 3D Liveness Check on the User. Then verifies and generates a high-resolution image of the User's Face, in compliance with the ICAO 9303 and ISO 29794-5 standards, for use in printing Official Photo Identification Documents, such as Passports.
Customize Colors & Themes: FaceTec allows you to configure its look and feel to match the styles and UX of Your Own Application. The Sample App allows Users to toggle through different themes that demonstrate a variety of App styles. FaceTec recommends choosing one as a baseline, copying the code from the Sample App, and modifying it as desired.
Server Dashboard
After performing a few User Sessions, check Your Server Dashboard to see Your Session History Data from the FaceTec SDKs.
Test on Yourself, for Yourself
The FaceTec SDKs are designed to work in the Real World. New Users are guided by FaceTec's On-Screen Instructions on how to perform Successful Sessions and prove 3D Liveness. FaceTec SDKs achieve 96-99% real-world first-time User success because even if the User has to retry, they will likely pass seconds later after seeing the Retry Guidance Screen, which shows the User's Face side-by-side with an image featuring the Ideal Pose and Lighting.
Remember: Real Users will follow on-screen guidance and do their best to succeed because they want FaceTec to work for them. That may seem obvious, but in Usability Testing, testers sometimes push the limits and try to get the sessions to fail. It is fine to occasionally try the extreme cases, but keep in mind that the mainline test scenario should always be as similar to real-world Use Cases as possible.
FaceTec scenarios you can quickly test:
- Quick Scenery Change: Perform a FaceTec 3D Liveness Check successfully. Now walk to a few other spots in your building or room and try it again. You should continue to be successful.
- Try some Spoofs: Display an image from another device or print out a high-resolution photograph. Try to spoof the FaceTec SDKs by presenting your digital face, your printed face, or somebody else's face. You can even try using videos or turning your printout into a 3D mask.
- Enrollment and Re-Verification: Perform an Enrollment successfully. Now walk around to various other spots using the Re-Verification functionality. FaceTec SDKs will continue to Re-Verify you even as you change environments.
- Imposter Check: Using the same Enrollment account from above, hand the test app to another person and ask them to perform Re-Verification. Even though they are a real person, the FaceTec SDKs will not succeed because it is not you!
Integrating FaceTec into Your App (Video Tutorial)
Initial integration of the FaceTec SDKs into Your Application can be done in as little as 10 minutes. The videos below demonstrate the initial integration steps into a basic app.
Android:
Please also see the corresponding Android SDK Initial Integration Guide.
iOS:
Please also see the corresponding iOS SDK Initial Integration Guide.
Browser:
Please also see the corresponding Browser SDK Initial Integration Guide.
Integrating FaceTec into Your App: Step-by-Step Guide
Below is a Step-by-Step Guide that mirrors the steps in the above Integration Videos.
Before Starting Your Integration
It is extremely important to build, test, and use the FaceTec Sample App before getting started with Your Integration. The Sample App Code should be your primary reference for gaining an understanding of how the FaceTec SDKs will be integrated into Your Application.
Step 1 - Download and Extract the FaceTec SDK
The FaceTec Device SDK (Android, Browser, or iOS) should already be downloaded as a result of testing the Sample App in the steps above.
The FaceTec Device SDKs are available to download from the Downloads Page.
Step 2 - Add/Import the FaceTec SDK
The steps for importing the FaceTec SDK are different for each Device SDK Platform.
Android: Import the
facetec-sdk-X.X.X.aarinto Your Project as shown in the Android SDK Integration Video.Browser: Copy the
core-sdk folderinto Your Project. The Specific Steps for importing thecore-sdk folderdepends on the Scripting Language and Framekworks being used. The Browser SDK Integration Video shows how to import the FaceTec SDK into a TypeScript Project.iOS: Import the
FaceTecSDK.xcframeworkfile into Your Project.
Important Note: FaceTec recommends using theFaceTecSDK.xcframeworkinstead of theFaceTecSDK.framework. TheFaceTecSDK.xcframeworkhas a specific simulator framework that allows it to compile and build on the Xcode Simulator when it is running on an Apple Silicon Mac.
Step 3 - Initialize FaceTec
Initialize FaceTec by calling initializeWithSessionRequest(...) to load the library and validate Your Key.
Initialize FaceTec as early as possible, and always before the moment the User needs to perform a Scan: To conserve memory, the FaceTec SDKs do not load important binaries and resources until
initializeWithSessionRequest(...)is called. TheinitializeWithSessionRequest(...)method takes 1-2 seconds or less on most modern devices for all Device SDKs. However, older devices and devices under heavy loads can take 5-7 seconds or more to perform initialization tasks in the background. Therefore,initializeWithSessionRequest(...)should be called as early as possible in Your App's Workflow to provide a fast and seamless experience when launching the FaceTec UI. The Sample Apps each demonstrate callinginitializeWithSessionRequest(...)on App Startup, prior to enabling any App functionality. This ensures that when a User taps to start a Session, they can immediately begin the Session Startup Process and Camera Initialization, rather than having to wait for Initialization to complete.
Step 4 - Add the Configuration, Processor, and Networking Code from the FaceTec Sample App
Before proceeding, first refer to the Sample App Implementations for 3D Liveness Checks, 3D Enrollments, 3D:3D Re-Verification, 3D:2D Photo ID Matching, and ID Scanning.
To use each of FaceTec's Core Features, you will need to copy the Configuration File, Session Request Processor, and Networking Code from the Sample App into Your Project.
Please see the integration videos above for more details on how these files can be quickly added to Your Project.
Step 5 - Review the Session Request Processor
Please Note: This is a very important step in the integration process.
SessionRequestProcessordemonstrates how to handle requests from the Device SDK that need a response from the FaceTec Server. This code also uses the Networking Code that handles uploading data to Your Middle-Layer Webservice.You must read and understand all code from
SessionRequestProcessor. FaceTec highly encourages you to set a breakpoint inonSessionRequest(...)andonResponseBlobReceived(...), step through them, and understand how each of them operate.
The Session Request Processor (SessionRequestProcessor) is responsible for sending the Request Blob for FaceTec's Core Features. It is important that all code from SessionRequestProcessor is understood, as it is responsible for the Logic Flow of the FaceTec SDK in Your App.
onSessionRequest(...)- Uses Your Team's Networking Code to upload the Request Blobs for FaceTec's Core FeaturesonResponseBlobReceived(...)- Processes the response from the FaceTec Server and continue/completes execution of FaceTec's Core Features
The Session Request Processor and its Associated Files demonstrate the Recommended Implementation and should primarily be left intact and unmodified. Adding Logic or Making Code Changes that deviate from the Session Request Processor's Demonstrated Functionality is not supported and may lead to unexpected behaviors, limiting FaceTec's Ability to assist Your Team in these scenarios.
Warning: Listed below are some of the Logic and Code Changes that could result in unexpected behaviors in Your Integration:
- Creating Asynchronous Timers
- Enforcing Custom Callbacks
- Adding Race Conditions in Your Logic and Code
- Changing the FaceTec UI Launching Code
- Making Extraneous Network Requests
- Invoking App UI Changes
- Altering FaceTec's UI or Logic with Undocumented Methods
Step 6 - Start the FaceTec Session
Once the necessary files are added, performing FaceTec's Core Features is as easy as using one of the below FaceTec Methods with a new instance of SessionRequestProcessor:
start3DLiveness(...)- The FaceTec Method for performing 3D Liveness Checks and 3D Enrollments.start3DLivenessThen3DFaceMatch(...)- The FaceTec Method for performing 3D:3D Re-Verification.start3DLivenessThen3D2DPhotoIDMatch(...)andstartIDScanThen3D2DMatch(...)- The FaceTec Method for performing 3D:2D Photo ID Matching.startIDScanOnly(...)- The FaceTec Method for performing ID Scanning.
The Integration Videos demonstrate how to perform a 3D Liveness Check by clicking a button that calls the start3DLiveness(...) FaceTec Method.
Step 7 - Add the Result Callback
It is important to note that Session Request Processor is responsible for handling the entire FaceTec Process. After FaceTec has finished, the final step is to give control of the UI/UX back to Your Main Application. The result/completion handlers are demonstrated in the Sample Apps and can be tweaked and tuned to meet Your Team's Requirements.
Since Session Request Processor already handles the entire Logic Flow for FaceTec's Portion of Your Application, it is recommended that Your Team keep the payload simple and instead use the contents of the API Response to control execution of Your Client Code when control is given back to Your Main Application.
Customizing the Interface
Customizing the FaceTec SDKs to fit Your Application's Branding should be a fairly straightforward task. FaceTec allows you to customize every color, font, string, border, button, stroke, and fill-in interface.
Please see the UI Customization reference guide for more information on customizing the various interface components.
Please see the String Customization guide for more details on customizing and localizing every piece of text in the FaceTec Interface.
Next Steps - Android, Browser, iOS
Android - Additional Steps
R8 and ProGuard Exceptions
The FaceTec SDK library must be excluded from being processed by R8 or ProGuard.
-dontwarn javax.annotation.Nullable
-dontwarn com.facetec.sdk.**
-keep,includecode,includedescriptorclasses class com.facetec.sdk.**
{ *; }
DexGuard Exceptions
If using DexGuard, your ProGuard configuration file must contain an additional -keepresourcefiles directive:
-dontwarn javax.annotation.Nullable
-dontwarn com.facetec.sdk.**
-keep,includecode,includedescriptorclasses class com.facetec.sdk.**
{ *; }
-keepresourcefiles assets/cache_uyertuazlkxcjrlwkejr/**
Permissions and Minimum API Level
The FaceTec SDK requires an Android API Level of 21 or higher. The FaceTec SDK also requires the following manifest entries:
<uses-permission android:name="android.permission.CAMERA" />
<uses-permission android:name="android.permission.INTERNET"/>
// The following two permissions are not required when using Production Keys
<uses-permission android:name="android.permission.ACCESS_NETWORK_STATE"/>
<uses-permission android:name="android.permission.ACCESS_WIFI_STATE"/>
iOS - Additional Steps
Development-Only Framework for Xcode Debugger
In FaceTec iOS SDK v10.0.32+, the FaceTec SDK Production Framework (FaceTecSDK.xcframework) may experience undesirable behavior if used with Xcode and Other Debuggers. The FaceTec SDK can still be imported, but if Your Team initializes or uses other FaceTec APIs while also using Debugging Tools, such as Xcode Debugger, then these Debugging Tools may interfere with FaceTec's Camera Feed Security Checks and cause instability (only while debugging).
To use Debugging Tools for Development Purposes, please use the FaceTec SDK Development-Only Framework (FaceTecSDKForDevelopment.xcframework). The FaceTec SDK Development-Only Framework can be linked into Your Xcode Project and used in the same manner as the FaceTec SDK Production Framework.
Important Note: For optimal security, the FaceTec SDK Development-Only Framework should not be used in a Production Environment. Your Team should not submit Applications integrated with the FaceTec SDK Development-Only Framework to the App Store.
Build Script for Debug vs. Release Mode
In FaceTec iOS SDK v10.1.4+, the Sample App utilizes the new Build Phase, Swap FaceTecSDKForDevelopment Framework, to determine which FaceTec SDK Framework to use. The new Build Phase is located after the Embed Frameworks Phase in the Build Phases Section.
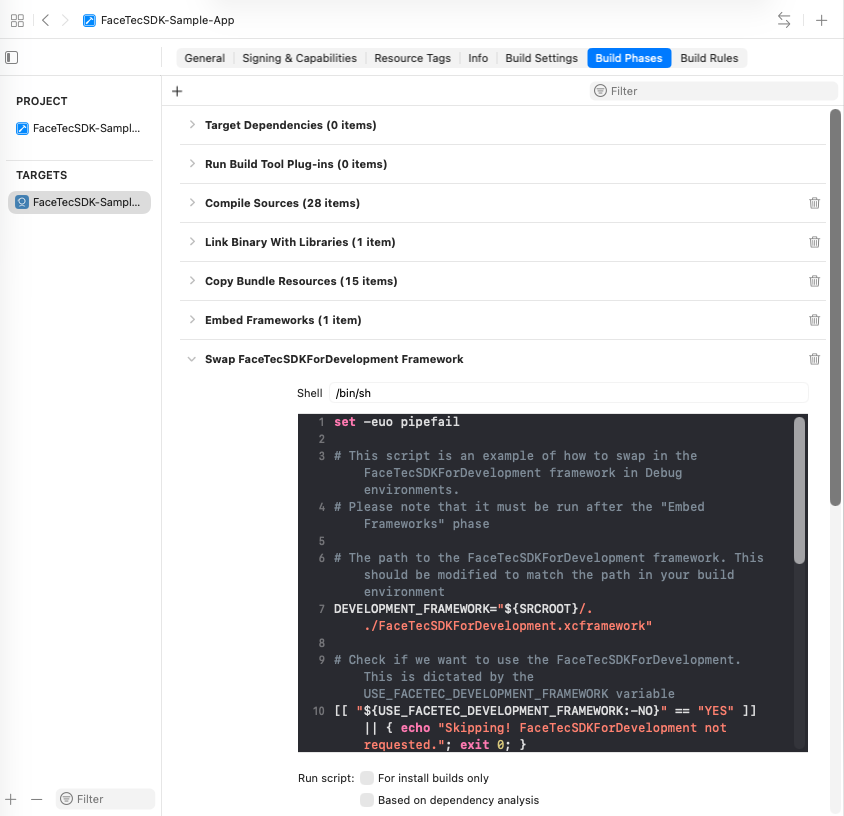
Important Note: To add this Build Phase to Your Team's Application, DEVELOPMENT_FRAMEWORK needs to be updated to the path of where the FaceTec SDK Development-Only Framework is located.
In Swap FaceTecSDKForDevelopment, the USE_FACETEC_DEVELOPMENT_FRAMEWORK variable is used to determine which FaceTec SDK Framework should be used (i.e. the FaceTec SDK Development-Only Framework or the FaceTec SDK Production Framework). The USE_FACETEC_DEVELOPMENT_FRAMEWORK variable is dependent on the Build Configuration and specified in the FaceTecConfigurationForTestApplication Configuration File.
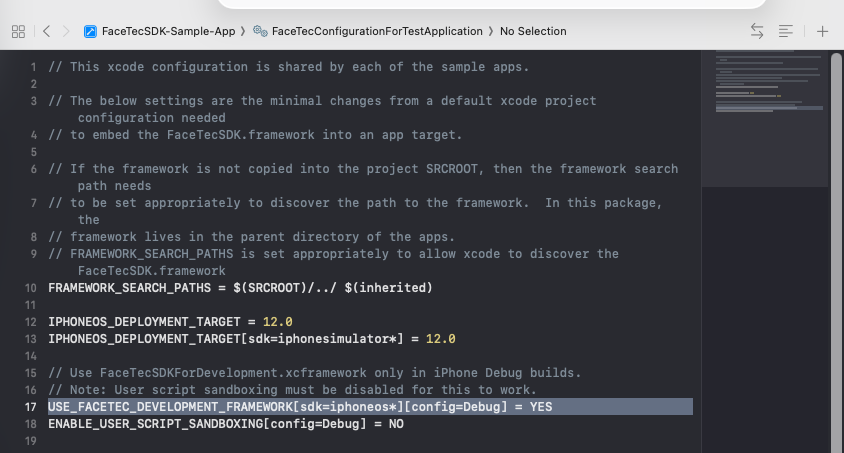
Important Note: The USE_FACETEC_DEVELOPMENT_FRAMEWORK needs to be updated appropriately if Your Team chooses to use the Sample App's Swap FaceTecSDKForDevelopment Build Phase in Your Team's Application.
The USE_FACETEC_DEVELOPMENT_FRAMEWORK variable should only be set toYESfor Debug and Test Builds. It should not be set toYESfor Release Builds.
If Xcode is using the Debug Configuration, then the FaceTec SDK Development-Only Framework (FaceTecSDKForDevelopment.xcframework) is used.
If Xcode is using the Release Configuration, then the FaceTec SDK Production Framework (FaceTecSDK.xcframework) is used.
Important Note: Your Team should only include the FaceTec SDK Production Framework in Applications that are shipped to the App Store. Your Team should not include the FaceTec SDK Development-Only Framework.
The FaceTec SDK Development-Only Framework is only needed when your Application needs to execute FaceTec Functionality while connected to Xcode's Debugger.
Camera Permissions
The NSCameraUsageDescription key must be set in your Info.plist. The value you specify here will be displayed to the User in the iOS camera permissions dialog.
Browser - Additional Steps
Resource Directory and Images Directory
You can use the FaceTecSDK.setResourceDirectory and FaceTecSDK.setImagesDirectory APIs to set a custom location for serving the core FaceTec files. By default, the resources directory is in the FaceTecSDK.js directory, whereas the Facetec_images directory is in the coreSDK directory.
The Sample App demonstrates setting the paths to these directories. However, the resources directory and Facetec_images directory can also be moved. If these directories are moved, the directory paths for the FaceTecSDK.setResourceDirectory and FaceTecSDK.setImagesDirectory APIs will need to be updated as well.
Extremely Old Browsers
While FaceTec uses basic JavaScript with no dependencies, the "const" keyword is used. Extremely old browsers do not support the use of const and will receive a console error when loading the FaceTecSDK.js directory. It is recommended that developers supporting these old browsers detect and handle such cases. The SDK Sample App comes with its own code to detect such cases and alert Users.
Setting Up Correct MIME Type for WASM Resources for Optimal Performance
The Browser SDK WASM files must be served with the "application/wasm" MIME Type in order for Browsers like Chrome and Firefox to run these resources with optimizations. The configuration of MIME types for these files will vary depending on the type of web-serving technology you are using. Please consult Your Webserver Configuration Options to find the appropriate configuration for serving these resources.
If the WASM files are not served correctly, you will see the below error in the Chrome Dev Tools Console:
[Report Only] Refused to compile or instantiate WebAssembly module because 'unsafe-eval' is not an allowed source of script in the following Content Security Policy directiveBrowser - iFrames
FaceTec requires implementations where the Browser SDK is used inside of an iFrame to use the iFrame Feature Flag. Please Send FaceTec a Support Request for permission to use the Browser SDK in an iFrame.
iFrame Usability (Browser Fullscreen Mode required)
iFrames can exist anywhere on the screen with any size. Since the FaceTec UI requires the FaceTec Frame to be positioned in the top-center of the screen, the SDK must be launched from an iFrame using the entire screen. This allows the FaceTec SDK to automatically reposition the FaceTec Frame, regardless of its initial position. If the entire screen is not being used, then the User will need to click the "Open Full Screen" button before they can proceed*.
* Apple prevents usage of the Fullscreen APIs specifically on iPhones (iPads are OK). For iPhone Users, Your Team is responsible for ensuring the iFrame is positioned well for good UX on iPhones.
Initialization
The iFrame will prompt the User to open Fullscreen Mode (if the entire screen is not being used). A small view with a button must be rendered by the FaceTec SDK because User Interaction is required to programmatically invoke the FullScreen API. This functionality is all handled by FaceTec's internal code. The new interface element is fully customizable using the FaceTecEnterFullScreenCustomization. The flow looks like this:
